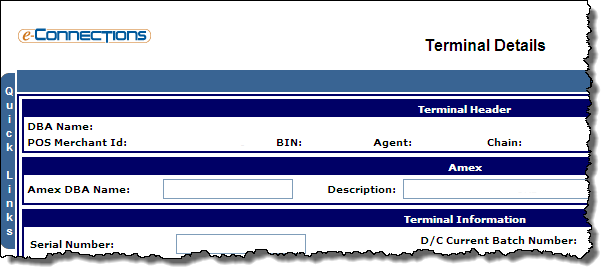
Add, edit, or select the field information as required in the various panels (fields marked with a red asterisk are mandatory): Amex
Amex
If the merchant is set up to accept American Express, the Amex DBA Name and Description appear here by default; you can edit the Amex DBA Name if required.
Terminal Information
- Serial Number: The serial number assigned to this terminal.
- Attachment Code: The Attachment Code selected for the terminal on the Terminal Setup page appears here by default.
- MIF Location Code: The Merchant Information File Location Code for the terminal appears here by default; this is an alternative identifier for a terminal within a BIN. If the BIN has been set up for MIF processing, you can click the adjacent Change MIF button to change this code.
- D/C Dial Maximum Count: The number of times that the terminal will attempt to dial the EDC phone numbers to transmit a batch.
- D/C Current Batch Number: The three-digit batch number that the terminal will be set to after a partial or full download is completed. Typically, the default value is used for this field. It is usually easier to change the batch number in terminal memory field 078. When the batch number is changed through this field, it is easy to forget to reset this field back to 001. Therefore, when a download occurs the batch number resets to whatever was left in the field.
- Transaction Prim 1 Key/Prime 2 Key: The option selected from the drop-down list indicates the type of transactions that the terminal can perform on the 1 and 2 keys respectively. The available options are:
- L556/L556: This option allows the merchant to only perform swiped-card transactions on the 1 and 2 keys.
- L556/L558: This option allows the merchant to perform swiped-card transactions on the 1 key (L556) and Mail/Phone Order transactions on the 2 key (L558).
- L558/L558: This option allows the merchant to only perform Mail/Phone Order transactions on the 1 and 2 keys.
- Idle Prompt: The text that will display on the terminal when it is not in use. The terminal will display the current date and time when this field is left blank.
- Static IP Info Present: When selected, this check box indicates that the terminal uses a static IP address.
Printer Settings
These printer settings control the printed output from the terminal.
- Printer Model: The selection from the drop-down list indicates the printer model attached to the terminal.
- Printer Type: The selection from the drop-down list configures the terminal to recognize the type of printer attached to it.
- Auth Only Receipt: Determines if transactions performed as authorization only (key 5) will print. Transactions performed as authorization only on the 5 key will not capture in the terminal's memory.
- Print Customer Copy: The selection from the drop-down list indicates if a copy is printed for the merchant or the customer.
- Slip Receipt Format: The selection from the drop-down list indicates the type of receipts being used when a slip receipt-type printer is attached to the terminal.
- Receipt Account Number Truncation: The selection from the drop-down list (Yes or No) indicates whether or not the terminal is enabled to print the truncated account number on receipts.
- Merchant Receipt Truncation: When selected, this check box indicates that the account number will be truncated on the merchant's receipt.
- Print Time Indicator: When selected, this check box indicates that the time of the transaction will be printed on the receipt.
- Roll Receipt Type: When this check box is selected, the disclaimer message will be printed at the bottom of the receipt.
- Detail Report Account Number Truncation: When this check box is selected, the Detail Report printed on the terminal will truncate the card number.
Auto Close Settings
These settings determine the manner and frequency with which a terminal uploads a batch of transactions into the capture system.
- Auto Close: When selected, this check box enables the terminal to transmit a batch automatically at a pre-set time.
- Auto Close Time 1: The time (0000-2359) that the terminal will auto-close within a 24 hour period.
- Auto Close Time 2: The time (0000-2359) that the terminal will auto-close a second batch within a 24 hour period.
- Auto Close Attempts: The number of times that the terminal will attempt to auto close.
- Display Reminder: When this check box is selected, the terminal displays a reminder message to the merchant to check totals when the terminal is set to auto settle.
- Reminder Time: The time to display a reminder message that prompts the merchant to verify totals before performing an Auto Close.
- Reminder Msg: The text that appears on the terminal if the Display Reminder field for auto close is enabled.
- Verify Totals: When this check box is selected, the terminal prompts the merchant to verify manually the totals in a batch before auto close can take place.
- Force Settle: When this check box is selected, the terminal forces the merchant to settle a batch manually if a communication error occurs during auto close.
- Auto Close Reports: The option selected from the drop-down list indicates the type of reports that will print after a successful auto close. The available options are:
- Totals
- Srv/Clk, Totals
- Details, Srv/Clk, Totals
- Host Connection Type: The option selected from the drop-down list indicates the type of host connection. The available options are:
- S-Single
- M-Multiple
- I-Interleaved
Header / Custom Footer Lines
These settings allow you to specify custom information that prints on receipts originating from the terminal.
- Header Line 4/5/6: A customized message to be printed on lines four, five, and six of the transaction receipt header.
- Footer Line 1/2/3/4: A customized message to be printed on lines one, two, three, and four of the transaction receipt footer.
Debit, EBT, Surcharge and Other Settings
These settings control the manner in which the terminal executes automated teller machine, cashback, and electronic benefits transfer (EBT) transactions, and include PIN pad and surcharge configuration options.
EBT Settings
- EBT Trans Type: The option selected from the drop-down list indicates whether the terminal can process food stamps or cash benefits. The available options are:
- Not Supported: This option indicates the terminal can process neither food stamps nor cash benefits.
- Food Stamps: This option indicates the terminal can process food stamps only.
- Cash Benefits: This option indicates the terminal can process cash benefits only.
- Both: This option indicates the terminal can process both food stamps and cash benefits.
- EBT FCS Id: The state government-issued Food and Consumer ID number assigned to the merchant.
- EBT Surcharge Amount: The surcharge amount attached to EBT transactions.
ATM Settings
- Re-Enter Password: A customized password for ATM Re-Enter transactions. To use this field, you must enable password protection for this terminal function using the Password Protect field.
- Receipt Sign Line: The option selected from the drop-down list indicates whether an optional signature line is printed on ATM receipts.
- ATM Cancel/Return: The option selected from the drop-down list indicates whether ATM cancel or return functionality on the terminal is password protected.
PIN Settings
- Pad Available: The option selected from the drop-down list indicates whether a PIN pad is attached to the terminal. The available options are:
- No PIN Pad
- There is a PIN Pad
- PIN Pad Type: If the option There is a PIN Pad is selected from the Pad Available field in this panel, then the option selected from this drop-down list indicates the type of PIN pad that is attached to the terminal. The available options are:
- Integrated
- P1300
- S9 TDES Capable
- S9 TDES/PCI/PED
- No Pin Pad
- PIN Pad Idle Prompt: If the option There is a PIN Pad is selected from the Pad Available field in this panel, then the entry in this field indicates the prompt that displays when the PIN pad is idle.
Surcharge Settings
- Attach Surcharge: When this check box is selected, a surcharge is attached to Debit and EBT transactions in the amount set in the Surcharge Amount field in this panel.
- Surcharge Amount: If the Attach Surcharge check box in this panel is selected, the entry in this field indicates the surcharge amount applied.
- Surcharge Receipt Description: If the Attach Surcharge check box in this panel is selected, the entry in this field indicates the description of the surcharge.
Other Settings
- Merchant ABA Number: The American Banker's Association number for the merchant; a nine-digit number that identifies the merchant with a debit network. If you do not know the ABA number, you can enter nine zeros in this field.
- Merchant Settlement Agent (FIID): The four-character identification number assigned by the Debit Gateway.
- Reimbursement Attribute: The option selected from the drop-down list indicates whether the merchant is a retail or a supermarket merchant with a qualifying or pre-existing Interlink debit card acceptance. The option selected also impacts the rates that a merchant is charged when an Interlink debit transaction is processed. If you do not know the correct value to enter, contact your supervisor. The available options are:
- 0 - Other Direct Debit
- W - Pre-existing Supermkt Me
- X - Pre-existing Retail Merc
- Y - Qualifying Supermkt Merc
- Z - Qualifying Retail Merch
Dial Settings
The fields in this panel enable you to configure the terminal's dial settings.
- Dial Type: The option selected from the drop-down list indicates the type of dialing system (tone or rotary) used by the merchant's phone system.
- Settle Comm Type: The option selected from the drop-down list indicates whether the terminal is using a dial-up (Dial) or IP connection (GPRS) to settle the batch.
- Auth Comm Type: The option selected from the drop-down list indicates whether the terminal is using a dial-up (Dial) or IP connection (GPRS) to receive an authorization.
- PreDial Flag: When selected, this check box indicates that a client wants their Verifone terminal to perform a PreDial authorization on a Credit Card transaction.
- Force Dial: When selected, this check box enables dial out without hearing a dial tone.
- Auto Answer Indicator: When selected, this check box indicates that the terminal answers incoming calls automatically.
- Auto Answer Number of Rings: If the Auto Answer Indicator check box in this panel is selected, the entry in this field indicates the number of rings before the terminal answers incoming calls automatically.
- Batch Upload Speed: The option selected from the drop-down list indicates the modem speed at which the terminal transmits a batch.
- Download Speed: The option selected from the drop-down list indicates the speed at which the terminal will download.
- Transaction Speed: The option selected from the drop-down list indicates the speed at which the terminal will authorize a transaction.
- Semi-Integrated
This check box and its associated fields are intended for future development.
Gateway Settings
The fields in this panel enable you to configure the terminal's Gateway TransIT settings.
Tip Settings
- Tip Option: The option selected from the drop-down list indicates whether the tip function and the "Enter Server ID" prompt are enabled when performing a transaction.
- Tip At Time Of Sale: When selected, this check box indicates that the terminal will prompt for a tip prior to dialing out for the approval.
- Auto Tip Percentage: The percentage the terminal will use to calculate automatically the tip amount at the point of sale.
- Display Tip Percentage: When selected, this check box indicates that the terminal will display the tip percentage on the receipt.
- Tip Assist Percentage 1/2/3: These fields enable you to enter up to three suggested tip amounts that will be printed at the bottom of the receipt.
Flags and Adjustments
- Market Specific Data: The option selected from the drop-down list indicates what additional transaction information is supplied with the transaction. This data is required for some CPS transactions. If this field is blank, no market specific data is supplied. The available options are:
- A: Valid auto rental market specific authorization data supplied.
- H: Valid hotel market specific authorization data supplied.
- N: Invalid hotel or auto rental market specific data supplied.
- Fraud Control Keys: The entry in this field indicates the type of fraud control that is enabled for a terminal when a card is swiped. The possible entries are explained as follows:
- 00000000: No fraud control enabled.
- 11111111: The terminal requires the last four digits of the card number to be entered.
- 22222222: The terminal displays the full card number.
- 33333333: The terminal requires the last four digits of the card number to be entered and displays the full card number. This entry is not supported by all terminals.
- Manager Password: A customized password for any management reports.
- Password Protect Keys: A password for selected terminal keys and functions.
- Maximum Number of Adjustments: The maximum number of adjustments that can be made to a transaction in the batch.
- Device Code: The entry in this field designates the type of device requesting an authorization and the merchants industry type. Acceptable values for this field are:
- DR: Dial Terminal/Retail
- DF: Dial Terminal/Restaurant
- SR: Retail for PP2K
- SD: Direct Mktg for PP2K
- DH: Dial Terminal/Hotel
- SF: Restaurant for PP2K
- SH: Hotel for PP2K or P-PTNR
- Language Indicator: The option selected from the drop-down list configures the language that the terminal will use to display text.
- Beeper On: When selected, this check box configures the terminal keys to beep when pressed.
- Amount Adjustment: When selected, this check box enables the merchant to change the amount of a transaction already captured in the terminal.
- Amount Adjustment Password: When selected, this check box requires a password to be entered when a user performs an amount adjustment. This check box becomes available if the Amount Adjustment check box in this panel is selected.
- Settle To PC: When selected, this check box allows the terminal to transmit its batch to a PC when using POS-partner. This is not currently supported by Global Payments.
- Duplicate Trans Processing: When selected, this check box enables the terminal to check for duplicate card numbers and transaction amounts prior to authorizing the card.
- AVS Flag: When selected, this check box activates the Address Verification System flag, which enables terminal prompts for manually typed Visa card numbers only. If a manually entered Visa card number and a "Card Present" configuration setting is selected, the terminal will prompt for the ZIP code on the account. For non-Visa cards, the terminal will not prompt for a ZIP code. If a "Card Not Present" configuration is selected on a non-Visa card, the terminal reverts to a mail/phone order transaction.
- Authorization Only: When selected, this check box disables the terminal from capturing transactions in its memory. This information overrides the values entered in the Data Capture Required field on the Card Range - Setup page. This option is enabled by default if the terminal is configured to authorize transactions but not capture this information.
CPS Settings
- Reset Ref Number To 001 Flag: When selected, this check box enables the terminal to reset transaction reference numbers after a successful transmit. When this check box is cleared, the terminal will increment reference numbers after a successful transmit.
- Data Augmentation Flag: When selected, this check box allows the merchant name and address to be transmitted during an authorization. This check box should always be selected.
- Purchasing Card Flag: When selected, this check box enables terminal prompts for Visa or MasterCard purchasing cards.
- Check Expiration Date: When selected, this check box enables the terminal to verify a card’s expiration date prior to dialing out to the host.
Invoice Settings
The fields in this panel enable you to configure the terminal to request additional invoice related data when authorizing a card; an example of additional data might be an invoice number, which is required for MO/TO merchants:
- Number Keys: The 9-character entry in this field specifies which keys (identified by their position in the 9-character entry) will prompt for additional data, using the characters Y (for the key of that position to prompt) and N (for the key of that position not to prompt). When this field is enabled, it defaults to NNNNNNNNN. Positions 1-9 correspond to terminal keys as follows:
- 1: Purchase or Mail/Phone Order (1 key)
- 2: Purchase or Mail/Phone Order (2 key)
- 3: Reserved - not used (3 key)
- 4: Credit (4 key)
- 5: Auth Only (5 key)
- 6: Offline (6 key)
- 7: Reserved - not used (7 key)
- 8: Private Label (8 key)
- 9: Reserved - not used (9 key)
Number Flag: When selected, this check box enables the terminal to issue the prompt Enter Invoice Number on transactions.
Note: The Number Flag check box MUST be selected if the merchant is processing MO/TO (Mail Order/Phone Order) transactions.
- Prompt: The entry in this field indicates the text that will display when any of the Invoice Number Keys listed in the Number Keys field in this panel are set to Y.
Note: This field only becomes available if at least one of the Invoice Number Keys in the Number Keys field in this panel is set to Y.
Terminal Authentication
The fields in this panel enable you to set up the authentication security feature.
Note: Each of these fields should contain at least one numeric character and one alphabetic character. Alphabetic characters must be upper case. No characters can repeat consecutively. Do not use spaces in these fields.
Hotel and Lodging
- Calculate Check-In Amount: When selected, this check box enables the terminal to multiply the dollar amount entered in the Room Rate Amount field in this panel by the number of days in the customer's stay.
- Room Rate Amount: The entry in this field indicates the per-day rate used by the terminal to calculate the check-in amount.
- Prestigious Property Indicator: The selection from the drop-down list can allow the terminal to generate its own approval codes that fall under a pre-configured amount. The terminal will not dial out for an approval if the dollar amount is below this amount.
- Print Check-In Amount: When selected, this check box enables the printer to print the pre-authorized amount on the check-in receipt.
- Print Checkout Receipt: When selected, this check box enables the printer to print a receipt when performing a checkout.
- Fire Safety Indicator: When selected, this check box enables the fire safety indicator.
Advanced Terminal Settings
- Print Close Tab Receipt: When selected, this check box enables the terminal to print a closed tab receipt.
- Print Open Tab Receipt: When selected, this check box enables the terminal to print an open tab receipt.
- Print Disclaimer: When selected, this check box enables the terminal to print a disclaimer at the bottom of the receipt.
- Print Customer Copy: The selection from the drop-down list indicates whether a copy is printed for the Merchant or the Customer.
- Custom Label Indicator: When selected, this check box enables the printing of the custom label text (as entered in the Custom Label Text field in this panel) on the receipt.
- Custom Label Text: If the Custom Label Indicator check box on this panel is selected, the text entered in this field will be printed on the receipt.
- E-Commerce Indicator: The selection from the drop-down list indicates what cardholder information, if any, is received over the Internet by means of a secured or unsecured data transfer. The available options are:
- Prompt If Encrypted
- SSL Secured
- Non SSL Secured
- SET With Certificate
- SET Without Certificate
- No ECI (this is the default)
- Manual Entry Password: When selected, this check box enables a password on all manually-entered transactions.
- Shift Processing: The selection from the drop-down list indicates the way in which the terminal processes transactions by shift number, if any. The available options are:
- Signature on Gift: When selected, this check box indicates that the terminal will require the customer's signature for a gift card transaction.
- Settle Unadjusted Tip: When selected, this check box enables the terminal to close a batch in which some transactions have not had a tip adjustment.
- Counter Pay Tip: When selected, this check box configures the terminal to prompt for a tip after the transaction has been completed.
- IRS Signature Line: When selected, this check box enables a signature line on the IRS Tip Report.
- Excessive Tip %: A percentage amount entry in this field enables an error message to appear if the tip amount exceeds that percentage amount entry. Acceptable values for this field are 00-99. Single-digit values must be entered with a leading zero; for example, 04.
- Tip Overage %: A percentage amount entry in this field enables the terminal to authorize a percentage over the meal amount to cover the tip.
- Auto Close Open Tab: When selected, this check box enables the terminal to auto close a batch with open tabs.
- Close Tab With New Card: When selected, this check box allows the terminal to accept a different card to close an open tab.
- Open Tab Signature: When selected, this check box enables the terminal to print a customer signature line on an open tab receipt.
- Default Open Tab Amount: The entry in this field indicates the default amount to be requested when a tab transaction is performed.
- Excessive Tab %: A percentage amount entry in this field enables an error message to appear if the close tab amount exceeds the open tab amount by that percentage amount entry. Acceptable values for this field are 00-99. Single-digit values must be entered with a leading zero; for example, 04.
- Cash Advance: When selected, this check box enables the terminal to allow cash advances.
- Lock Keyboard: When selected, this check box enables the terminal to require a password whenever a key is selected.
- Batch Authorization: When selected, this check box enables the batch authorization function on the terminal.
- Process Tax: When selected, this check box enables the terminal to calculate tax and add it to the transaction before dialing out.
- Process Tax %: The entry in this field indicates the amount of tax to be added to each transaction.
- Supervisor Password: The entry in this field indicates the password used for any feature which was set to use the Supervisor Password.
- Local Tax Rate %: This field is for future development.