The Terminal Setup page enables you to configure a new terminal for a merchant, define the terminal’s front end hierarchy, and generate a V Number for the terminal file.
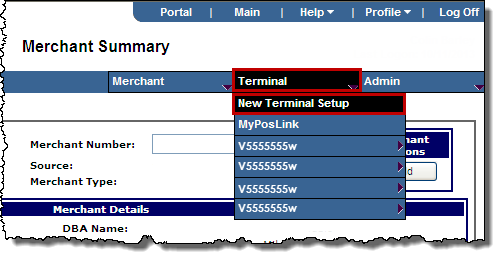
- Search for the merchant to display its details on the Merchant Summary page.
- From the Terminal menu, click
 New Terminal Setup.
-or-
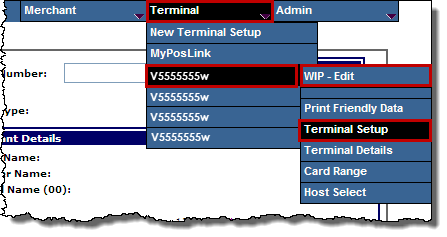
To edit a terminal that is already partially set up for the merchant, from the Terminal menu, select the terminal you want to view or edit, and then select WIP - Edit, or, if available, Terminal Setup.
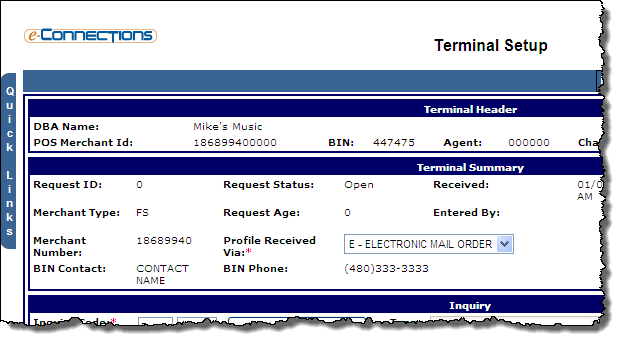
The Terminal Setup Page opens.
- In the Terminal Summary panel, from the Profile Received Via drop-down list, select the option to indicate how the terminal profile information was received, or accept the default.
- In the Inquiry panel, accept the default B 05 in the two Inquiry Code fields, which indicates B - BANK type and 05 - NEW INSTALLATION REQUEST code.
- In the Hierarchy panel, verify or enter the hierarchy details for the new terminal (fields marked with a red asterisk are mandatory).
- BIN: If required, enter the six-digit BIN number for the terminal. This number identifies your bank. A BIN is assigned by TSYS Acquiring Solutions and is the highest level of the front-end hierarchy. The front-end hierarchy is used by TSYS Acquiring Solutions to route an authorization or batch to the correct Acquirer. BINs contain Agents, the second level of the front-end hierarchy.
- Agent: If required, enter the six-digit Agent number for the terminal. This is the number that your bank uses to identify a smaller bank (or ISO) that processes credit card transactions through your bank. Agents are the second level of the front-end hierarchy. They contain Chains and roll up into BINs. If a merchant does not process transactions using the Agent level of the front-end hierarchy, enter 000000 as a value for this field.
- Chain: If required, enter the six-digit Chain number for the terminal. This number identifies a merchant's chain of locations or stores. Your bank assigns a Chain. Chains are the third level of the front-end hierarchy. They contain Merchants and roll up into Agents. If the merchant does not process transactions using the Chain level of the front-end hierarchy, enter 000000 in this field.
- POS Merchant ID: If required, enter the twelve-digit POS Merchant ID number for the terminal.
- Store: Enter the four-digit store number for this terminal. This is a number that identifies the merchant location. This might be a randomly generated number.
- Terminal: Enter the four-digit number that identifies this terminal at this location. This might be a randomly generated number.
- MCFS Number: If required, enter the MCFS number for this terminal. This number translates the Visa/MC ID attached to an AMEX or Discover authorization to their respective AMEX or Discover ID Numbers. For clients who are configured to automatically complete this field, the MCFS Number is made up of the 12-digit Merchant ID, plus the first three digits of the Store Number. If your bank generates its own MCFS Number, you can enter it manually in this field. For the terminal details page, this number is derived from the request page.
- MVV: If required, enter the Merchant Verification Value for this terminal. This is a 10-digit number used to identify merchants that participate in SMF (Select Merchant Fee) programs. This 10-digit number is assigned to the merchant. The first 6-digits of this number are assigned by VISA and the last 4-digits are defined by the acquirer, in agreement with VISA.
- V Number: Once you have entered correct information into the other mandatory fields in the Hierarchy panel, you can click in this field and then click the Get V Number button to generate the V number for this terminal, which will then populate this field. The V number is the address assigned to the new terminal for the database.
- Request Contact: Enter your name as the person creating the file.
- Request Contact Phone: Enter your phone number as the person creating the file.
- Request Contact Email: Enter your email address as the person creating the file.
- In the Terminal Information panel, enter information for the new terminal (fields marked with a red asterisk are mandatory).
- SSL Participant: Select this check box if the terminal’s access method is through Ethernet.
- Attachment Code
A code that indicates the type of file being built. Possible values:
- SA - STANDALONE
- IV - IVR DATA CAPTURE MERCH
- IT - IVR AUTH ONLY MERCH
For DialPay file builds:
- A merchant only needs one terminal configured as IT or IV; any other terminals the merchant has can be configured as SA.
- A merchant cannot have a mix of IT and IV configured terminals.
- Any terminal type can be configured with the IT option.
- The IV Attachment Code should not be applied to any Class A, Class B+. or Class B terminal that uses authentication; it can cause issues with the dial transaction process. The merchant would need to configure a separate IV DialPay terminal.
- Service Level: Select RAO - OLA FULL DLL INSTALL, PARTIAL SERVICE, BANK OWNED EQUIP.
- Alt. Build Description: This field is auto-populated based on the entry in the Alt. Build Type field.
- Tokenization: Select this check box if the terminal is participating in Tokenization. See Terminal Setup: Tokenization and Encryption.
- Token Zone Name: If you have selected the Tokenization check box, from the drop-down list, select the name to assign to a Token Zone ID. See Terminal Setup: Tokenization and Encryption.
- Encryption Vendor: If you have selected the Tokenization check box, from the drop-down list, select the desired option. See Terminal Setup: Tokenization and Encryption.
- DialPay Passcode: If required, enter the six-character numeric password for DialPay terminal entry.
- Copy An Existing Terminal?: Select this check box to configure the new terminal by copying the configuration of an existing terminal.
- Copy From V Number: If you have selected the Copy An Existing Terminal? check box, enter the V number for the terminal you want to copy, and then click the Copy button.
- In the HWSW Information panel, enter the hardware and software configuration information for the new terminal.
- Processor: From the drop-down list, select the name of the transaction processing entity for the terminal; VITAL_VISANET.
- Manufacturer: From the drop-down list, select EQUINOX.
- Model: From the drop-down list, select AIO.
- Track Type: From the drop-down list, select 2.
- Software: From the drop-down list, select AIOHTL.
- Click the check box(es) to indicate the card types the terminal will accept. Options include: AMEX, Discover, PayPal, JCB, and ATM. The SE/ID numbers are auto-populated from the values on the Merchant Summary page.
- Alt. Manufacturer: This field is for future use. This field will display the name of the alternate terminal manufacturer to support Point to Point Encryption (P2PE).
- Alt. Model: This field is for future use. This field will display the name of the alternate terminal being used to support P2PE.
- Alt Software: This field is for future use. This field will indicate the specific TSYS Acquiring Solutions P2PE certified software that is programmed into the terminal.
Note: Changing hardware or software options will reset all fields for the terminal and may require you to revisit all affected pages.
- If the Store Descriptor Information panel appears, you can select the option button for the appropriate Store Descriptor from the list, if there is more than one.
Note: The Store Descriptor Information panel only appears if the merchant already has other terminals set up in the system.
- In the Merchant Information panel, review the fields for accuracy and make any changes as needed.
The fields in this panel contain the terminal-related demographics including the name and address that the merchant wants to assign to the terminal, terminal access information, service level information, and important phone numbers. This information is printed on receipts originating from the terminal.
The fields in this panel are auto-populated based on settings on the Merchant Summary page and in the Store Descriptor Information panel. Those marked with a red asterisk are mandatory.
- In the Dial Settings panel, review the fields for accuracy and make any changes as needed.
- Customer Service: The customer service phone number.
- EDC Primary: The phone number that the terminal will dial when transmitting a batch.
- EDC Secondary: The phone number that the terminal will dial when transmitting a batch if the primary number is unavailable.
- Download: The access code and phone number required for terminal downloads.
The fields in this panel are auto-populated based on settings in the HWSW Information panel, and where appropriate, provide the Access Code, Phone number and Description.
- In the Terminal Status panel, enter details in the fields to complete the terminal file build.
- Profile Completed: Select this check box if the terminal file build is ready to be downloaded. The current date will then appear in the adjacent Date field by default.
- Resolution Code: From the drop-down list, select the resolution code INSTALLATION COMPLETED.
- Terminal Setup Details: In this box, you can enter any notes regarding the terminal setup if required.
- Click Save at any time to save the information you have entered.
- Click Next.