- From the Available Card Ranges list, select the card ranges you want to add, using SHIFT+click and CTRL+click for multiple selections, and then click the Add button.
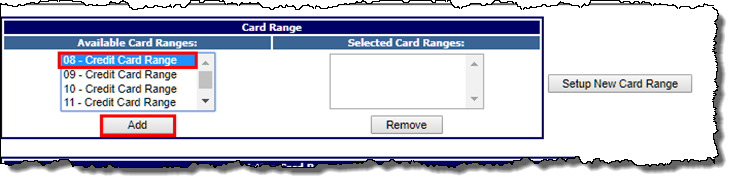
The card ranges you selected appear in the Selected Card Ranges list.
- From the Selected Card Ranges list, select the first of the of the new card ranges.
- Click the Setup New Card Range button.
The page refreshes with your first card range in context.
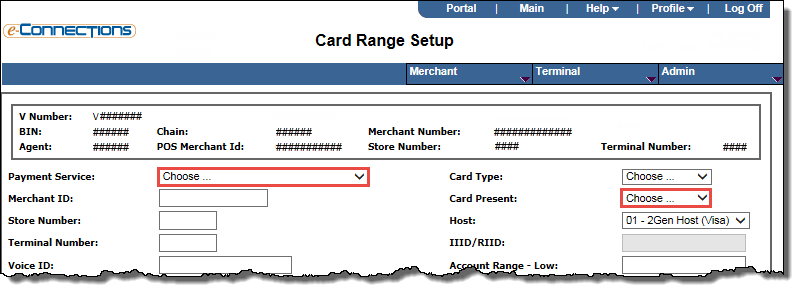
- Select the appropriate Payment Service for that card range.
The related fields auto-populate with the appropriate data.
- From the Card Present drop-down list, select the required card-present option for the card range.
The recommended option is 3 - Both.
- In the Floor Limits panel, if you want to enable floor limits/quick service functionality for the card range, select the Use Floor Limits check box.
The related fields in the panel become available, which you can complete as required:
 Receipt Floor Limit
The lowest transaction amount for which the terminal will print a receipt.
- QPS Receipt Option
The Quick Payment Service receipt option, which determines the circumstances under which a terminal will print a receipt for quick service transactions. These are the options available:
- 0 - None
- 1 - Prompt Customer
- 2 - Customer Only
- 4 - Merchant Only
- 10 - Both - Confirm
- 18 - Both - Auto
- Auth Floor Limit
The transaction amount below which the terminal generates its own approval codes.
- Signature Floor Limit
The lowest transaction amount for which the terminal will print a signature line on the receipt.
- Select the appropriate check boxes for the desired Indicators.
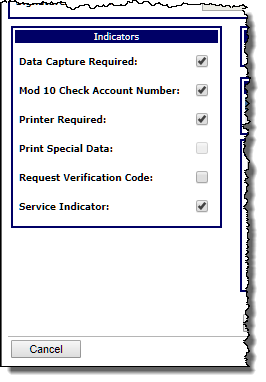
Note: You should only select Mod 10 Check Account Number for valid credit card ranges, such as Visa, MasterCard, and American Express.
Note: If your payment service is ATM, then you should select Printer Required and you must add sharing groups.
- Depending on the Payment Service selected for the card range, the Partial Authorization Indicator panel appears on the page; from the Partial Auth drop-down list, select the required option.
Indicates the correct support level based on card type and merchant preference. Possible values:
- NO PARTIAL AUTHORIZATION
- PARTIAL AUTHORIZATION FROM HOST
- PARTIAL AUTHORIZATION ON ALL TRANSACTIONS
- PARTIAL AUTHORIZATION WHEN CARD PRESENT
- In the Voice Authorization Phone panel, enter the Primary authorization Access Code and Phone number, as required.
- In the Sharing Group panel, select each required group in the Available list and then click the Add button to add it to the Existing list (and if required, select a group in the Existing list and then click the Remove button to remove it).
Configures the terminal to recognize the debit networks that the merchant can accept.
- ! - ATH/Evertec
- 1 - AFFN ATM
- 5 - Visa Check Card II
- 7 - Shazam (ITS)
- 8 - Maestro
- A - AMEX ATM
- B - Plus ATM
- C - CU24
- D - Discover ATM
- E - Accel
- F - NYCE
- G - Interlink
- H - Pulse
- J - MasterCard ATM
- K - EBT POS
- L - Pulse
- M - Star
- N - Star
- O - Cirrus ATM
- Q - Star
- S - Pulse
- T - EBT ATM
- U - AFFN
- V - VisaNet
- W - Star
- Y - NYCE
- Z - Star
- Click the Continue button.
- Repeat these sub-steps for each card range being added.
- When that is completed, click the Next button.
- Add desired hosts as needed.
- In the Available Host scroll box, select and click the the desired hosts.
- Click the Add button.
- Click the Setup Host button.
- Verify default fields are correct or change if necessary.
- Click the Continue button.
Note: Stage only files do not use the host feature.
- Click Save at any time to save the information you have entered.
- As required:
Click the Next button.
-or-
Click the Validate button.
-or-
If the Board button is available, click Board. Otherwise, click the Validate button, then click the Board button.