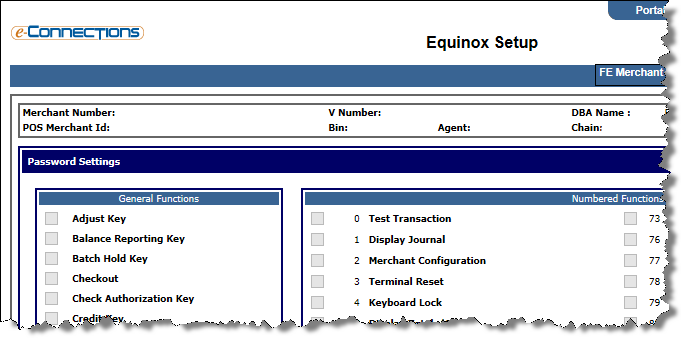
Equinox Setup page
Depending on the information you selected on the HWSW Information panel of the Terminal Setup page, clicking Next at the Terminal Setup page, Terminal Details page, or Card Range Select page opens the Equinox Setup page.
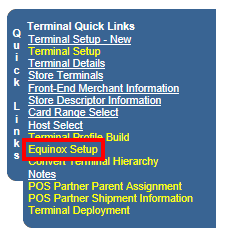
You can also open the Equinox Setup page from any of the Terminal-related screens as follows:
Configure the Equinox setup for the terminal as follows:
- In the Password Settings panel, select the check box for each of the following functions that you want password protected on the terminal:
General Functions
- Adjust Key
- Balance Reporting Key
- Batch Hold Key
- Checkout
- Check Authorization Key
- Credit Key
- Default to Cash Advance
- House/Cash Key Password
- Initialize Key
- Mail Key
- Offline Key
- Open/Close Tab Key
- Transmit Key
- Void Key
Numbered Functions
- 0 Test Transaction
- 1 Display Journal
- 2 Merchant Configuration
- 3 Terminal Reset
- 4 Keyboard Lock
- 5 Display Totals/Counts
- 6 NMS Call
- 8 Display Batch Number
- 9 Delete Batch
- 10 Authorization Only Transaction
- 21 Find Journal Transaction
- 25 Speed Dial Configuration
- 29 Display Transmit Status
- 30 Local Programming
- 68 PC Upload
- 69 Clear PC Upload Flag
- 70 Training Password
- 71 Printer Password
- 72 Reprint Last Receipt
- 73 Reprint Any Receipt
- 76 Debit Transaction
- 77 Server/Clerk Configuration
- 78 Cashier Functions
- 79 Reports
- 82 Printer Test
- 83 Display Test
- 84 Keyboard Test
- 86 Manager Password Configuration
- 87 Tip Discount Configuration
- 89 Card Reader Test
- 90 Terminal Password Configuration
- 91 Display Software Version
- 92 Program Load
- 94 PIN Pad Test
- 95 Network Statistics
- 96 Response Time Monitor
- 97 Local Option Configuration
- 98 Communication Parameters
- In the Terminal Settings panel, select the check boxes and complete the fields where appropriate for all of the following functions that you want to activate on the terminal:
Server and Clerk Settings
- Accept Tips: Select this check box to enable the terminal to process tips.
- Adjust By Server/Clerk: Select this check box to enable the terminal to request the entry of a Server ID number whenever the Adjust key is pressed.
- Assign Name For Server/Clerk: Select this check box to enable the terminal to assign names to server and clerk IDs.
- Print Server/Clerk Sign Line: Select this check box to enable the terminal to print a Server signature line on server reports.
- Prompt For 'Clerk': Select this check box to change the word "Server" to "Clerk" when Server/Clerk Processing is enabled on the terminal.
- Review By Server/Clerk: Select this check box to require the entry of a Server ID number to review transactions.
- Server/Clerk Password: Select this check box to require the entry of a password after a Server ID number is entered.
- Server/Clerk Processing: Select this check box to enable the terminal to request a Server ID number when the merchant enters a transaction.
Receipt Settings
- Pre-Print Receipt: Select this check box to enable the printer to print a receipt header after a card is swiped.
- Printer Used: Select this check box to enable the use of a printer at the terminal.
- Print Error Receipt: Select this check box to enable the printer to print a receipt indicating a non-approved transaction.
- Print Receipt Disclaimer: Select this check box to enable the printer to print a disclaimer at the bottom of the receipt.
- Print 'Tip': Select this check box to enable the printer to print the word "Tip" on the receipt.
- Print Time On Receipt: Select this check box to enable the printer to print the time of the transaction on the receipt.
- Print 'Total' On Receipt: Select this check box to enable the printer to print the word "Total" on the receipt.
Dial Settings
- Audible Modem: Select this check box to enable the merchant to monitor communication with the host through audible modem tones.
- Keyboard Dialing: Select this check box to enable the terminal to function as a phone when in used in conjunction with a handset.
- Memory Dialing: Select this check box to enable the terminal to speed-dial pre-programmed phone numbers.
- Pre-Dial Dialing: Select this check box to enable the terminal to dial the authorization host as soon as the card is swiped. The terminal will hold the line open while the merchant enters all the authorization request information.
- Referral Dialing: Select this check box to enable the terminal to dial the merchants voice authorization center automatically when the terminal receives a "Call" response from a card issuer.
- Toll Dialing: Select this check box to enable toll dialing from the terminal.
Hotel and Fine Dining Settings
- Duplicate Trans Processing: Select this check box to enable the terminal to check for duplicate card numbers and transaction amounts prior to authorizing the card.
- 'Exceeds Auth Amt' Prompt: Select this check box to enable the terminal to notify the merchant if the tip amount entered exceeds the pre-authorized amount. The pre-authorized amount is determined by the value entered in either the Auth Margin % field on the Card Settings page or the value entered in the Tip Calculation % field on the Terminal Settings page, with the value entered in the Tip Calculation % field taking precedence.
- Prompt For 'Folio Or Room': Select this check box to enable the text that you enter into the adjacent Folio/Room Prompt Text field to display on an Equinox terminal when performing a check-in. This applies to Hotel software only.
- Folio/Room Prompt Text: If you have selected the Prompt For 'Folio Or Room' check box in this panel, enter the text you want to display on an Equinox terminal when performing a check-in. This applies to Hotel software only.
- Open/Close Tab Key: Select this check box to enable the Tab key on the terminal.
- Open Tab Amount: If you have selected the Open/Close Tab Key check box in this panel, enter the the default tab dollar amount applied when a merchant opens a tab.
- Process By Shift: Select this check box to enable the terminal to process transactions by shift number.
- Tip Calculation %: Enter the percentage of the sale that will be added as a tip amount to sales transactions.
Other Settings (1)
- Cash Advance Address Verification: Select this check box to enable the requirement of address verification for cash advances originating from the terminal.
- Cash Advance Processing: Select this check box to enable cash advance processing for the terminal.
- House Account Cash Key: Select this check box to enable the House Account/Cash key on the terminal.
- Manual Programming Check: Select this check box to enable the terminal to allow a merchant or a bank representative to add a check service that is not added at the terminal level.
Other Settings (2)
- Auto Answer: Select this check box to enable the terminal to answer incoming calls automatically.
- Capture Track I Name: Select this check box to enable the terminal to prompt for the cardholder's name if the terminal is unable to read the data from the cards magnetic stripe.
- Display Card Number: Select this check box to enable the credit card number to be displayed in the terminal's display area.
- Lock Keyboard: Select this check box to enable the terminal to require a password whenever a key is selected from the terminal.
- Process Credits Offline: Select this check box to enable the terminal to process refunds.
- ECR Baud Rate: Enter the baud rate at which data is transmitted for electronic cash register transactions.
- Printer Baud Rate: Enter the data transmission rate for the terminal's printer.
- Manager Password: Enter the password required to run any management reports from the terminal.
- Terminal Password: Enter the password that the merchant must enter when any password-protected key or function is pressed at the terminal.
- Process Voids Offline: Select this check box to enable voids to be entered offline on the terminal.
- Reconcile Totals: From the drop-down list, select one of the following options to indicate how the merchant verifies totals when they press the Transmit key on the terminal:
- Transmit Batch w/o Key or Enter (02)
- Key Amount (00)
- Press Enter (01)
- Settle Merchant Number: Enter the Settle Merchant Number for the terminal, which comprises the 12-digit Merchant ID, plus the 4-digit Store number, plus the 4-digit Terminal number.
- Telephone Line Hold: From the drop-down list, select one of the following options to indicate the amount of time that the telephone line should remain on hold:
- 10 Seconds (02)
- 5 Seconds (01)
- 15 Seconds (03)
- 2 Seconds (00)
- Terminal Phone: Enter the phone number associated with the terminal.
- Click Save at any time to save the information you have entered.
- As required:
Click the Next button.
-or-
Click the Validate button.
-or-
If the Board button is available, click Board. Otherwise, click the Validate button, then click the Board button.