![]()
![]()
![]()
![]()
|
|
|
|
|
The Express interface is designed to present information clearly, help you navigate the system, provide visual cues to identify required information, and produce targeted feedback to assist you in identifying and correcting errors when they occur.
The following types of navigation are employed throughout the application to provide convenient access to the full range of the pages, functionality, and system options that Express offers.
Global navigation is a set of basic, system-wide functions that are present on each page. The global navigation bar is located in the upper right corner of the interface and includes the following:
Express pages are organized in a series of function-specific menus that are present on each page. These menus, organized together in a Navigation bar, represent the three functional areas that all Express pages fall under - Merchant, Terminal, and Admin. The options that are available on the Navigation bar vary according to your system configuration, your user privileges, and the entity that you have in context.
Local navigation is a set of page-specific buttons that help you navigate between sequential pages and perform common actions. Local navigation options include the following:
Additional local navigation buttons and their related functionality are described throughout this help system, where applicable.
Caution: Do not use your browser’s navigation buttons to navigate through the Express pages. Data that you enter on one page may be lost when moving to the next page. To prevent loss of data, use the local navigation buttons on the Express application pages.
Quick Links are contextually-appropriate hyperlinks that take you to other Express pages. You can find them in a Quick Links group box located on the right side of most pages. The visibility of Quick Links is validated against the permissions associated with your User ID. If you have questions about your ability to view Quick Links, verify that you have the appropriate level of access with your System Administrator.
Note: Quick links contained in terminal boarding pages save the data that you entered on the page you are currently visiting before advancing you to the linked page.
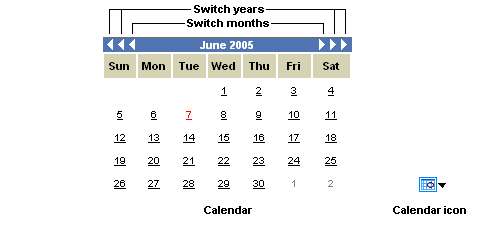
Many date fields in Express offer calendars that allow you to select the date that you want to enter in the associated field. Clicking a calendar icon displays the calendar for the associated field. Use the outer arrows to switch between years, and the inner arrows to switch between months. Click a date to insert the date into the associated field.
 _
_
Required fields are indicated with a red asterisk (*). Failing to enter or select a value for a required field will result in a submission or processing error. Please note that several terminal pages do not have required field indicators, because required fields are dependent upon your hardware and software selection.
In addition to navigation buttons, Express features a standard set of action buttons that you will use to accomplish various tasks within the application.
When you complete all the data entry and configuration tasks in the merchant boarding process, you are ready to validate and board the record. Validation can be performed as a separate process using the Validate button, or it can be done in combination with boarding by using the Board button.
Validating the merchant record verifies that the information provided in the merchant record is complete and applies business rules to the merchant data. If the record fails validation, you must go back and correct the conditions that caused the error.
When you choose the Board button rather than the Validate button, the system fires all the same rules that the separate steps of Validate and Board use, but in one click. Upon completion of the Board action, assuming no errors are found, the system will refresh the current page into View mode, providing visual confirmation to the user that their Board request was processed successfully. The user can then use the Reload function, where available, to continue making changes to subsequent entities.
Note: The MATCH Inquiry page will display a "Boarded Successfully" message after boarding rather than enter View mode.
The mode of an Express page determines the primary task being performed. Most Express pages consist of the following modes:
The mode that a page is in may change in response to your actions. For example, clicking the Edit button on a page that is in View mode will change that page's mode from View to Edit. This would allow you to modify the information on the page, instead of simply viewing the information in View mode. In this case, you might notice that read-only fields become editable and that additional buttons may appear or become enabled as a result of switching modes.
If the appearance or functionality of a particular page is not what you expected, verify that you are in the appropriate page mode. If necessary, change the mode of the page by clicking one of the action buttons described above to accomplish your task.
When sort buttons are present, you can sort data presented in tables in ascending or descending order. Click the button associated with the table column that you want to sort. The sort button for the actively sorted column appears highlighted in yellow.
Sort ascending (active):  _
_
Sort ascending (inactive):  _
_
Sort descending (active):  _
_
Sort descending (inactive):  _
_