Previous Topic

Next Topic

Book Contents

Book Index

Bank Billing Element Tables (BET Options)

Billing element tables are used to calculate the expense incurred and the income earned from servicing a merchant account. If a merchant level billing element table does not exist or is not assigned and the merchant has activity, then the system can use the default tables for the merchant bank, group, or association to calculate expenses for the merchant at month-end. It will also charge the merchant for the costs incurred in servicing the account.

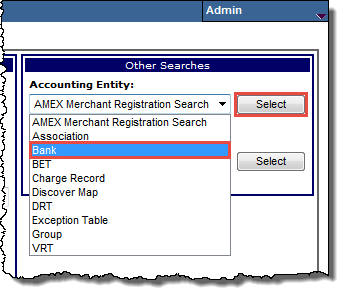
Express allows you to configure billing element tables for a number of categories, as described below. In addition, you can search a category to view the tables that exist for a merchant, modify tables, and delete tables.

Note: This page may be given a custom configuration for specific clients.

Navigation

  1. Open the 
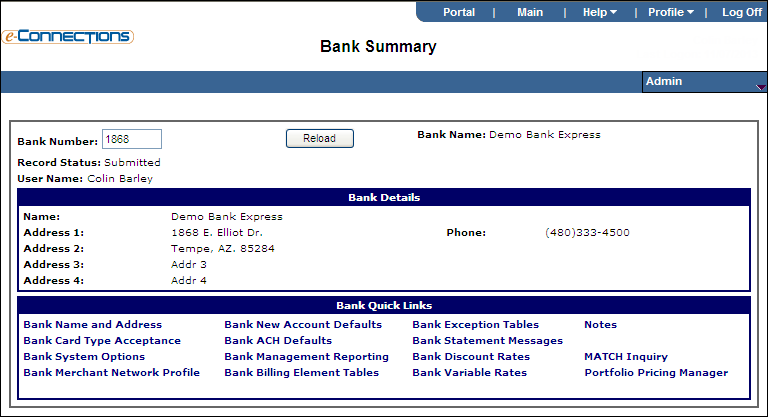
Bank Summary page for the bank.
  2. In the Bank Quick Links panel, click Bank Billing Element Tables.

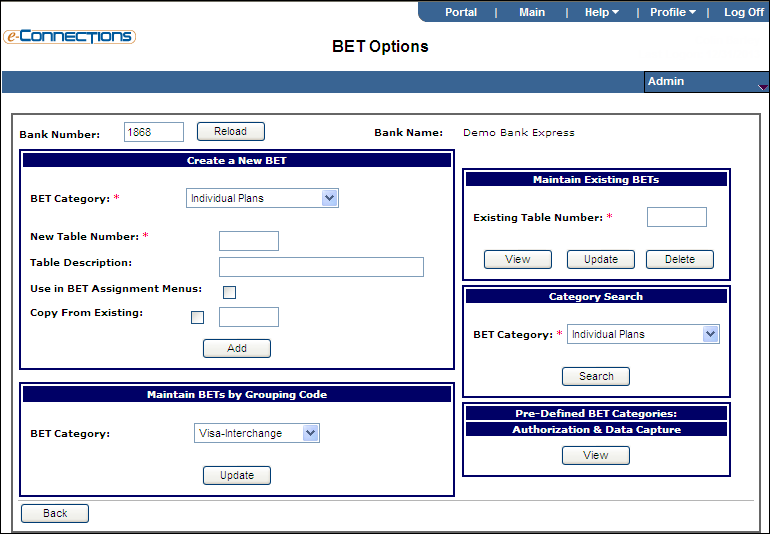
    The BET Options page opens.

Create an individual billing element table

  1. From the BET Category drop-down list, select Individual Plans.
  2. Type the identification number for the table in the New Table Number field. Fill out any of the appropriate optional fields.
  3. Click Add.

    The Bank BETs - Details page displays.

  4. Select a billing item from the Billing Items list.
  5. Enter values for required fields and optional fields, as needed.
  6. To add more billing items:
    1. Click Add.
    2. Select the item that you want to add from the Billing Items list.
    3. Enter values for required fields and optional fields, as needed.

    Repeat these sub-steps for each billing item that you want to add.

  7. Click Next.

    The Bank BETs - Details Verification page displays, showing the billing items that you added.

  8. If necessary, change the entered values for any of the billing items shown.
  9. Click Validate.

Create an authorization billing element table

  1. From the BET Category drop-down list, select Authorization.
  2. Type the identification number for the table in the New Table Number field.
  3. Click Add.

    The Bank BETs - Details page displays.

  4. Select a vendor from the Vendor list.
  5. Select a media type from the Media Type list.
  6. Select a card plan from the Card Plan list.
  7. Click Next.

    The Bank BETs - Details page displays.

  8. Select a billing item from the Billing Items list.
  9. Enter values for required fields and optional fields, as needed.
  10. To add more billing items:
    1. Click Add.
    2. Select the item that you want to add from the Billing Items list.
    3. Enter values for required fields and optional fields, as needed.

    Repeat these sub-steps for each billing item that you want to add.

  11. Click Next.

    The Bank BETs - Details Verification page displays, showing the billing items that you added.

  12. If necessary, modify any values for the billing items shown.
  13. Click Validate.

Create a data capture billing element table

  1. From the BET Category drop-down list, select Data Capture.
  2. Type the identification number for the table in the New Table Number field.
  3. Click Add.

    The Bank BETs - Details page displays.

  4. Select a vendor from the Vendor list.
  5. Click Next.

    The Bank BETs - Details page displays.

  6. Select a billing item from the Billing Items list.
  7. Enter values for required fields and optional fields, as needed.
  8. To add more billing items:
    1. Click Add.
    2. Select the item that you want to add from the Billing Items list.
    3. Enter values for required fields and optional fields, as needed.

    Repeat these sub-steps for each billing item that you want to add.

  9. Click Next.

    The Bank BETs - Details Verification page displays, showing the billing items that you added.

  10. If necessary, modify any values for the billing items shown.
  11. Click Validate.

Create a debit networks billing element table

  1. From the BET Category drop-down list, select Debit Networks.
  2. Type the identification number for the table in the New Table Number field.
  3. Click Add.

    The Bank BETs - Details page displays.

  4. Select a billing item from the Billing Items list.
  5. Enter values for required fields and optional fields, as needed.
  6. To add more billing items:
    1. Click Add.
    2. Select the item that you want to add from the Billing Items list.
    3. Enter values for required fields and optional fields, as needed.

    Repeat these sub-steps for each billing item that you want to add.

  7. Click Next.

    The Bank BETs - Details Verification page displays, showing the billing items that you added.

  8. If necessary, modify any values for the billing items shown.
  9. Click Validate.

Create a system generated billing element table

  1. From the BET Category drop-down list, select System Generated.
  2. Type the identification number for the table in the New Table Number field.
  3. Click Add.

    The Bank BETs - Details page displays.

  4. Select a billing item from the Billing Items list.
  5. Enter values for required fields and optional fields, as needed.
  6. To add more billing items:
    1. Click Add.
    2. Select the item that you want to add from the Billing Items list.
    3. Enter values for required fields and optional fields, as needed.

    Repeat these sub-steps for each billing item that you want to add.

  7. Click Next.

    The Bank BETs - Details Verification page displays, showing the billing items that you added.

  8. If necessary, modify any values for the billing items shown.
  9. Click Validate.

Create an electronic check billing element table

  1. From the BET Category drop-down list, select Electronic Check.
  2. Type the identification number for the table in the New Table Number field.
  3. Click Add.

    The Bank BETs - Electronic Check Selection page displays.

  4. Select a vendor from the Vendor list.
  5. Select a product from the Product list.
  6. Select a program from the Program list.
  7. Select an ACH 3rd party from the ACH 3rd Party list.
  8. Click Next.

    The Bank BETs - Details page displays.

  9. Select a billing item from the Billing Items list.
  10. Enter values for required fields and optional fields, as needed.
  11. To add more billing items:
    1. Click Add.
    2. Select the item that you want to add from the Billing Items list.
    3. Enter values for required fields and optional fields, as needed.

    Repeat these sub-steps for each billing item that you want to add.

  12. Click Next.

    The Bank BETs - Details Verification page displays, showing the billing items that you added.

  13. If necessary, modify any values for the billing items shown.
  14. Click Validate.

Create a Visa - Interchange billing element table

  1. From the BET Category drop-down list, select Visa - Interchange.
  2. Type the identification number for the table in the New Table Number field.
  3. Click Add.

    The Bank BETs - Details page displays.

  4. Select a billing item from the Billing Items list.
  5. Enter values for required fields and optional fields, as needed.
  6. To add more billing items:
    1. Click Add.
    2. Select the item that you want to add from the Billing Items list.
    3. Enter values for required fields and optional fields, as needed.

    Repeat these sub-steps for each billing item that you want to add.

  7. Click Next.

    The Bank BETs - Details Verification page displays, showing the billing items that you added.

  8. If necessary, modify any values for the billing items shown.
  9. Click Validate.

Create a MasterCard - Interchange billing element table

  1. From the BET Category drop-down list, select MasterCard - Interchange.
  2. Type the identification number for the table in the New Table Number field.
  3. Click Add.

    The Bank BETs - Details page displays.

  4. Select a billing item from the Billing Items list.
  5. Enter values for required fields and optional fields, as needed.
  6. To add more billing items:
    1. Click Add.
    2. Select the item that you want to add from the Billing Items list.
    3. Enter values for required fields and optional fields, as needed.

    Repeat these sub-steps for each billing item that you want to add.

  7. Click Next.

    The Bank BETs - Details Verification page displays, showing the billing items that you added.

  8. If necessary, modify any values for the billing items shown.
  9. Click Validate.

Create a Discover - Interchange billing element table

  1. From the BET Category drop-down list, select Discover - Interchange.
  2. Type the identification number for the table in the New Table Number field.
  3. Click Add.

    The Bank BETs - Details page displays.

  4. Select a billing item from the Billing Items list.
  5. Enter values for required fields and optional fields, as needed.
  6. To add more billing items:
    1. Click Add.
    2. Select the item that you want to add from the Billing Items list.
    3. Enter values for required fields and optional fields, as needed.

    Repeat these sub-steps for each billing item that you want to add.

  7. Click Next.

    The Bank BETs - Details Verification page displays, showing the billing items that you added.

  8. If necessary, modify any values for the billing items shown.
  9. Click Validate.

Copy an existing billing element table

  1. From the BET Category drop-down list, select Individual Plans.
  2. Type a table number for the table you are creating in the New Table Number field.
  3. Type the table number for the table that you want to copy in the Copy From Existing field.
  4. Select the Copy From Existing check box.
  5. Click Add.

    Note: After you create the new table, follow the procedure for the category of table that you created to complete the table's configuration.

Search a category

  1. In the Category Search panel, from the BET Category drop-down list, select the category of the billing element table that you want to search for.
  2. Click Search.

    The Bank BETs - List page displays. Results display in the Billing Element Tables group box.

  3. To narrow your search:

Modify a billing element table

  1. In the Existing Table Number field, enter the number of the billing element table that you want to modify.

    Tip: If you do not know the billing element table number, you can perform a category search to locate it.

  2. Click View.

    The Bank BET - Table List page opens.

  3. Select the table that you want to modify.
  4. Click Update.

    The Bank BETs - Details page displays.

  5. Enter values for required fields and optional fields, as needed.
  6. To modify an individual billing item:
    1. Select the item from the Billing Items group box.
    2. Enter values in the individual Billing Item group box for the billing item that you want to modify.
    3. Click Update.
  7. To delete an individual billing item:
    1. Select the item's Delete check box.
    2. Click the Delete button.
  8. To delete all billing items:
    1. Select the Delete All check box.
    2. Click the Delete button.
  9. Click Validate.

Delete a billing element table

Billing element tables that have a merchant or an association pointing to it cannot be deleted. If you do not know the billing element table number, you can perform a category search to locate it.

  1. In the Existing Table Number field, enter the number of the billing element table that you want to delete.
  2. Click Delete.
  3. The system will ask you to confirm that you wish to delete the individual BET. Click the Yes button to confirm.